|
What does a webmaster do? |
|
What does a webmaster do?
Tech Alumni Webmaster Gene Gill's answer:
"He takes care of a website". Of course "taking care
of" includes designing new
pages, preparing the new pages for the internet, uploading them to
the internet, plus keeping all pages on the website continuously
updated with changes and additions, as well as frequently adding new
photos, and making sure that broken links are promptly repaired.
He also arranges for the purchase of
domain names
(memphistechhigh.com),
signs up and pays the monthly/yearly fee for web hosting, and takes care
of the website's email.
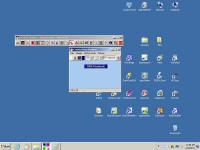
Knowing exactly what goes into designing pages for the internet, or
how the pages suddenly appear on the internet, is generally a
mystery to most folks. This page will show you step by step
illustrations of what the webmaster actually does to get a page "up"
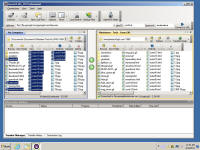
- or on the internet.
The illustrations, below, show the process of adding a
complete Tech Yearbook to the Tech Alumni website. The yearbooks
are generally scanned by others and the scanned files of each page
are sent to the webmaster. That's where this process begins.
Each illustration is an actual "screen shot" of the webmaster's
computer, as he goes through the process. |
| |
|
Click on small photos for an enlargement. |
|
|
|
|
|
|
 |
 |
|
|
|
|
|
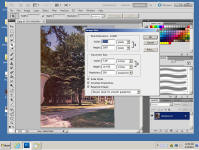
1. Open each scanned
page (file), one by one, in a program called PhotoShop -
which is a photo editing software program.. Page 8
appears in the illustration. |
|
|
|
|
2.
Begin
editing each scanned page - lighten, darken, adjust
contrast, sharpen - as necessary.
|
|
|
| |
|
|
|
|
|
Note: What is the difference between a page, a file, a .jpg
photo? When a yearbook page is scanned, the scanner
takes a picture of the page. The picture is
saved as a .jpg file. Thus, "yearbook page 8" in this
illustration is actually "photo 8.jpg". To distinguish
between the photos in the yearbook and photo files of the
yearbook pages, we will refer to them as either "page" or
"file" |
| |
|
| |
|
 |
 |
|
|
|
3. Format each
scanned page to fit the
design of the website.
|
|
|
|
|
4. Reduce the file size of
each scanned page so it doesn't take too long to load on the
website. A new edited page/file has now been created and
must be saved. |
|
|
| |
|
|
 |
|
When all the scanned
yearbook pages have been edited, formatted and saved as a new .jpg page/file, it's time to create a special
".html page"
to appear on the internet, where all these newly created .jpg
files will be posted. |
|
| |
|
|
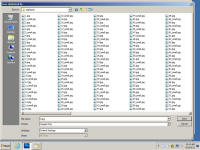
5.
Save each new page/file as a .jpg file. The
folder holding all the new files will begin to look like this. |
|
|
|
| |
|
 |
 |
|
|
|
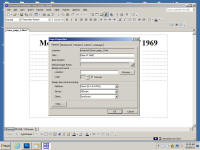
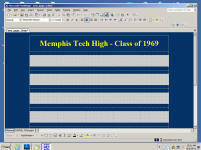
6. Open a web editing
software program called FrontPage and begin to create a totally
new .html page where all the newly created yearbook
files will be posted.
|
|
|
|
|
7. The new .html page
layout is planned with "tables"(those dotted lines),
colors, and heading text. Tables are "invisible"
and are used to keep the various parts of the layout, in
place and from "jumping around" when the .html page is
on the internet. |
|
| |
|
 |
 |
|
|
|
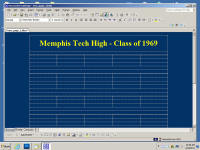
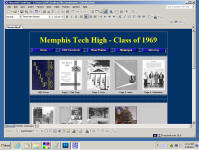
8. With background
color and text color added, the new .html page
layout will now look like this.
|
|
|
|
|
9.
Add a background color to some of the "tables". This
area is
where the new files will be posted/inserted one by one.
|
|
| |
|
 |
 |
|
|
|
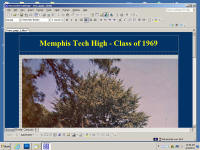
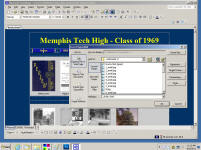
10. When the new
pages are first posted/inserted they are FULL SIZE. |
|
|
|
|
11. A thumbnail photo
(TN) of the full size page must be created ... |
|
| |
|
 |
 |
|
|
|
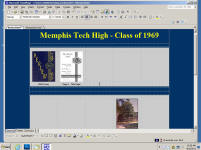
12. ...and then
inserted in the proper space. Text is added
below the TN. |
|
|
|
|
13. Steps 10, 11, 12
will be repeated for the additional yearbook page/files. |
|
| |
|
 |
 |
|
|
|
|
|
14. Most yearbooks
contain over 100 pages. The illustration above is
only up to page 8.
|
|
|
|
|
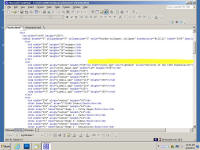
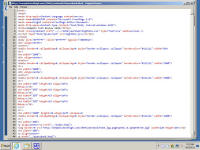
15. Code must
be added to each TN so that when the TN is clicked,
a full size pop up of that page will appear.
This code, which is "behind" the page and is unseen is:
<a href="cover.jpg" rel="lightbox"
title="<b></b>"> The
illustration shows all the code.
(More about this
code later) |
|
| |
|
| |
|
|
When all
pages/ files
have been added to the .html page, it's time to create a
navigation "menu" for the top of the .html page. |
| |
|
|
|
| |
|
| |
|
 |
 |
|
|
|
|
|
16. Open a software program
called ToolBox and create "buttons" for "Home", "1969
Yearbook", "New Photos", etc. |
|
|
|
|
17. These buttons will be
added to the top of the .html page to create a menu.
|
|
| |
|
|
| |
|
 |

|
|
|
|
|
|
18. Links (unseen code) must be
added to each button so that when it is clicked, it will
open a different page. |
|
|
|
|
19. The identical menu
must be copied to each page of the 1969 section - page by
page. |
|
| |
|
|
When the above
process has been finished for all pages and files, it's
time to "send up" the files to the internet.
You send up the files using "FTP" which means "file transfer
process". To use FTP, you must have a domain name (memphistechhigh.com)
and pay a company to host this domain on the internet.
You pay them for so much space on the internet and you pretty
much control what you put in this space. |
| |
|
 |
 |
|
|
|
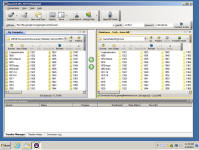
20. Open a program
called WS-FTP.
When it opens, you see two large windows. The window
on the left shows all the files on the webmaster's
computer. The window on the right shows all the
files that have been sent up to the internet. (You
will have pre-programmed the window on the right to open
to the space on the internet that you pay for). |
|
|
|
|
21. Go to the left
window and select each new file that has been created
(click on them and they turn blue). In the middle
between the left and right windows you see two arrows, one
pointing to the left and one pointing to the right.
Since the selected files are going to be sent to the
internet (right side), click on the right arrow.
Immediately the files begin being transferred to the Tech
Alumni space on the internet. |
|
|
|
|
Whenever you make
the slightest change to a website file on your computer, if
you want it to be seen on the internet, you must send up the
file again. When it's sent up again, it will over-ride
the file that's already on the internet and the change(s) will
show up immediately. |
| |
|
|
| |
|
|
| |
|
|
|
More about that
hidden Code... |
|
|
|
When the internet first began, everything that
appeared on a computer was written as code. You were never
sure what your design would look like, until you saw it on the
internet. Very complicated. Gradually, software programs
were developed that allowed "what you see is what you get"
design. As you designed a page, the software program wrote the
actual code for you "behind the page, where it would not be seen".
But it's there - on every single page that's on the internet.
The internet reads that code and interprets it as the shape, color,
photo, or text that we see.
|
Don't believe me? The
"screen shot" on the right shows the actual
source code for the complete yearbook of the Memphis Tech
High-Class of 1969 page. |
|
 |
| |
|
|
|
| |
|
|
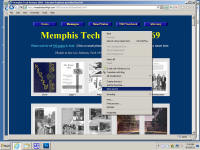
If you
want to see for yourself what the code looks like for
absolutely any page, do this: When the page is
open on your computer, RIGHT CLICK anywhere on the page
and then select "VIEW SOURCE". |
|
 |
| |
|
|
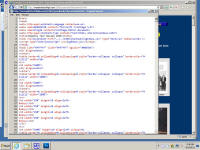
A pop up
window will appear showing you the source code for that
page. But if you're not familiar with code, you
won't understand it. |
|
 |
|
|
|
Some web designers don't want folks to view their source code and
they enter additional code which blocks the source code so you can't see it. As a webmaster, it is necessary to gradually
learn a little of this code so you will know, at least, how to interpret it.
Otherwise you aren't able to completely control what goes into your
designs.
|
|
| |
|
Conclusion: To make
a minor change to any existing page that's already on the Tech
Alumni website (such as a misspelled word), the webmaster must go
through at least half of these steps. To add a single photo to
an existing page, the webmaster will go through almost every step.
To add an obituary, the webmaster will go through almost every step
three times, because he creates the new obituary
(1), works on the existing Obituary Page
(2), and works on the existing Yearbook Page
(3). |
| |
|
PS:
There are over 5,100 pages on
the Tech Alumni website. over 100,000 photos, and over 500 folders,
holding over 200,000 individual files. It is a BIG website. |
| |
|
|
| |
|
|
| |
|


